Tag Archives: adventureiq

4 Skills to Perfect in Fort Backyard

So you’ve been reading our articles, went to one of our camps, or maybe just looking for something fun to do with the family. Here are four skills you can perfect in your back yard before you have to use them for real.

Fire Craft

The single greatest skill for both confidence and usefulness is mastering fire craft. But don’t play with matches; work on two paths of mastery. The first is using a sparking device like the Light My Fire from Industrial Revolution. The second is learning a primitive technique such as the bow-drill.612

Once you begin to master- push yourselves to experiment with various tools and harder conditions. A great activity for gaining experience is to tie natural fiber rope to two stakes or rods in the ground about 18 inches high and time yourselves on how long it takes to bundle materials, get a flame, and then burn the rope down.

The ability to start a fire is key to staying alive in the wilderness. This means fire starting is a priority in the list of bushcraft skills.

Some residential zones may restrict fire to specified enclosures. If restricted then use a homemade or purchased fire-pit for containment. We built a pit using 8”x12”concreate pavers to create a pit to practice in.

Gimme’ Shelter

Many backyards don’t have ready-sized trees to practice with. Still, there are many things you can do to create shelter. You can use t-post stakes purchased from local farm and feed stores to create anchor points that simulate trees and common tent stakes to represent natural wood stakes you would normally make in the back country. Just know where water, electric, and sprinkler lines lay.

Experiment with tarps, ponchos, and even a few discarded pieces of lumber. You kids will love that you are building a fort with them.

Learn a few knots, get some decent 550- cord and get to it!

Wood Splitting- Knife Skills

608Wood splitting with a survival knife- also known as batoning can add a valuable wilderness survival skill to your toolbox. This is useful because it helps you in creating smaller- easier to ignite pieces of wood even when the wood is wet. Learn with a full blade survival knife and work your way to using a small axe or hatchet.

Bushcraft Cooking

You’re getting the hang of fire building so might as well use it to try your cooking over an open fire. You can choose to use a grate in the beginning- but move yourself into experimenting with cooking with Dutch Ovens, #10 cans, and wooden spits.

Try making a “survival stew (anything you find in the fridge) in a coffee can or pick up a Cornish hen and cook it over open coals. Be sure to follow all safe food handling protocols- and it’s okay to use a meat thermometer to help you learn.

We still use Fort Backyard to master skills, and these four will get you on a path to perfecting skills before you have to use them.

Teraflex Tailgate Table

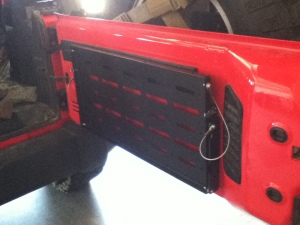
094The Teraflex Tailgate Table has been on my wish list since I saw Roger Mercier of Overland Frontier fixing breakfast at the Overland Expo using a drop table like this. This is the perfect accessory for any Jeep enthusiast needing a spot to make a quick sandwich, poor a glass of wine for your “glamping” companions, or even repair an RC car on. I used mine for a cooking surface for my two-burner stove, however I’m not sure I can recommend this due to the proximity of grease, fire, gas cans, and the rest of my rig. For everything else kitchen related, it is perfect!

030

Carl using a hose clamp to prevent the bit drilling too far

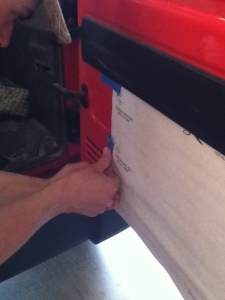
029 041The install took about 45 minutes. For the most part it is simply placing the pattern on the inside of the tailgate and DETAILED drilling. On my 2013 JK I had to ensure that we didn’t hit any of the spot welds and also be conscious of the degrees of metal thickness. The right side of the tailgate has more sheet metal than the left. Also our drill spot on the lower left was half thin and half double metal. This caused the drill bit to walk a bit and tried to “egg” the hole instead of a neat circle. Fortunately I had Carl helping me and being the master of machinery he is, immediately detected the problem. He finished out the last hole using a die-grinder at low-speed.

You should also be aware that if not careful- your drill bit can punch through the inside wall and leave a dent in the exterior wall. Teraflex has a highly informative video out there demonstrating how they did the install and specifically point this out. Recommend you check out their video as well. We didn’t have a tool to prevent the bit from going through- so we used a hose clamp around the bit. Worked like a charm!

065

We had to pre-crimp some of the Zert nuts to get them to grab traction on the tailgate

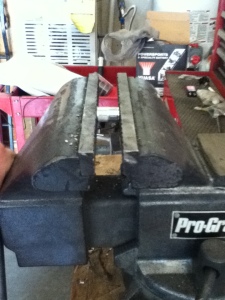
One issue we found on the thinner part of the tailgate wall was the Zert nuts getting enough traction to mushroom out. Zert nuts are similar to a rivet, except once installed they will accept a bolt or screw to hold an item in place. We pre-crimped the nuts so they would grab traction on the thinner part of the wall. If you do this—it is a VERY MINOR crimp. Try installing per instructions first.055

Once the nuts were in, it was just a matter of bolting the table onto the four nuts, doing some minor adjustments to the cable, and then off to make a sandwich.

Teraflex does have a cutting board available and I recommend ordering your multi-purpose table with one. I’m watching every dime right now to get ready for our Oregon/Washington/Canada trip and Washington Overland Rally trip and even though they are not expensive, I opted to not to get one and use our cutting board out of the trailer. Wishing I had bought one now and after the rally will put that on my “to-buy” list.068 072

The rack will hold a stove and as mentioned above but for me,  I’m not keen on this idea. My first real meal came Sunday afternoon in the mining country of the Boise Mountains. I was making Tri-tip burritos using my two-burner stove and cast iron. My stove is a bit odd in the way it set up with portable propane bottles, and I wasn’t comfortable with the way it sat on the rack. Not the fault of the rack, I have an odd-set up is all. Tri-tip does have a moderate level of fat on the underside. While testing I had a small grease fire and even though nothing was damaged, looking back, with fire in close proximity to my Trasharoo and Rotopax gas can, I think I will move the stove to a safer location.

096In my second testing along the Snake River on Monday, the table was perfect for dicing tomatoes and cutting lettuce for my special back-country finger sandwiches and wedge salad. It also made a great platform in the evening as I was conducting a wine tasting complete with assortments of cheese. No I have not lost the rugged edge; I was simply providing my wife and sister-in-law with a weekend of back-country luxury.

The well entertained ladies in the back country– Good lunch, warm fire, and me performing survival tricks!

139

The Tailgate Table allowed me to prep all kinds of snacks and meals for these ladies in the back country…including a wine tasting! Now I just need a rack and awning for some shade!

This is a well thought-out product and a must have for any Jeeper. Contact Teraflex.com or Quadratec.com to order yours!


Idaho Scenic Byways

DCIM100GOPROThis is the time of year to hit the scenic byways of Idaho. These are great one-day and even multi-day trips that most vehicles can handle. If you have been a steady reader of the blog or the podcast, you know we love to hit these 4-wheel adventures. Idaho has so much to offer.

When researching, make sure your first stop is to http://www.visitidaho.org/scenic-byways/ where you can order your free travel guide. While the guide lacks many of the details to plan out your trip, it does give you enough of a view to pull out the map and do some planning.

Go Prepared

While some trips don't require this much recovery gear, trips on backcountry byways requirs that you go completely preparred

While some trips don’t require this much recovery gear, trips on backcountry byways requires that you go completely prepared

038

But before you head out- think of how you pack for the trip. Remember Idaho’s byways range from rural to remote. Be sure you have any emergency gear packed for the trip such as first-aid, good communications, extra water, tools, etc. Some of these byways skirt alongside backcountry areas so help will not always be a phone call away. If you have a breakdown or other emergency- you need to be prepared to stay for awhile. In my other article I briefly outline what we take on trips such as the Owyhee Backcountry Byway, one of the most remote byway trips in Idaho.

I keep a road atlas with me to do over-the-hood planning while on the road. They are great for reference along the way

Shutter Bugs

253No matter where you start out from, there are great options for awesome scenery. Be sure to pack your camera and if you are really a shutter bug, pack those once-in-a lifetime lenses you rarely pull out. This last winter I had my dad along Sawtooth, Payette River, and Western Heritage byways where he had opportunity to shoot pics of Antelope, a young brood of Sand Hill Crane, and a few other hard to get close to animals. In addition, great scenery abounds on the byways so packing a tripod and a wide angle is a must. Pack extra batteries, throw in a dust cloth for the lenses, and maybe an extra memory card. There are even opportunities for the iPod photo enthusiast so keep your car charge handy.266

Soak in the Sites

  IMG_6040 Stop off at the small museums, wineries, and state parks along the way. There are great stops along the way like Craters of the Moon National Park along the Peaks to Craters Byway or Huston Wineries along the Snake River Byway. Most have great mom and pop diners for lunch, keep cash on hand for some of the better stops. Better yet, throw in your own picnic. We usually throw in lunch for the day and stop for dinner or start off with breakfast in a non-chain dive. IMG_6043I love driving but need a break from hours of windshield time. I like to find an area where we can park and either pull out sandwiches or I can do a quick burger or two on one of our portable grills. I even throw in a few lawn chairs to relax in.

Journal It

Capture moments along the way and post in the journal

Capture moments along the way and post in the journal

DCIM100GOPROThere are 30 official byways in Idaho. I recommend creating a special journal for the adventure, and log each one with thoughts to scribe, postcards, pictures, museum tickets, etc.


Sometimes we will take a few days to do one or more byways- and camp along the way. This is where our home built Explorer box designed by Compact Camping Concepts is a huge benefit.

Sometimes we will take a few days to do one or more byways- and camp along the way. This is where our home-built Explorer box designed by Compact Camping Concepts is a huge benefit.

For more information checkout the article just released from Magic Valley Times-News http://magicvalley.com/lifestyles/recreation/scenic-byway-adventures-adventure-guide/article_8f53f418-d7d0-11e3-aaf4-001a4bcf887a.html

In addition, I have a few write up on my own byway tours at AdventureIQ.com including these two…

https://adventureiq.wordpress.com/2012/02/20/465/

https://adventureiq.wordpress.com/2013/06/24/touring-the-owyhee-back-country-byway/

And if you see us on the road out there-stop and say hey! We just might have a sticker or two for you!

Ten Things Your 10 Year-old Should Know about Survival

Your job is to provide your kiddo with skills and knowledge to make it back alive if something was to happen

Your job is to provide your kiddo with skills and knowledge to make it back alive if something was to happen

Every year I run between 400-600 kids through survival training through venues like Scooters Youth Hunting Camp, Idaho Hunters Ed, the Adventure IQ Survival Day Camp, and multiple seminars at outdoor events, sporting good stores, church events, and private workshops. From this experience I have found there are a few essential skills every 10 year-old should know.

A big part of this is parent/mentor involvement. Don’t just buy a bunch of cool survival gadgets and throw them in a pack. Take full advantage of your base camp- ie- Fort Backyard to learn and practice these skills. If you have been in one of my workshops you will remember that one of the keys to teaching kids is to teach them one skill at a time, let them gain mastery of it and show they are responsible, then place it in their hunting or hiking pack. For us the basic building block of any pack is a hydration bladder and a solid pack designed for the size of your kiddo.

Below are the 10 things I believe every 10 year-old should master and be responsible/accountable to :

How to Build Shelter

This not only has to do with keeping warm, but also making shade as well as staying put. From basic methods of using a light-weight nylon tarp to making shelter from natural resources, a shelter provides the psychological benefits of keeping busy-ie-keeping fear at bay, keeps them at one spot and from wandering around, and the sense of “place” they need to survive. In addition it will keep them out of the elements.

How to Use a Knife

Using a knife well is a skill that has long since been lost. In days of old- if you were 10 and had not whittled something cool you were pretty much relegated to go play dolls with your sister. It wasn’t long ago boys would sit at recess and compare blades. Sometime around the 8th or 9th grade most of us made a bowie-knife in shop.
A knife is a practical tool and one of the first to add in a kit when they learn to use it safely and have a maturity for it. Start kids out young with a simple pocket knife with no more than four tools- main blade, skinning blade, can opener, and one other implement. Keep the blades small at first then move up from there.
Most important, receiving a knife is a rite of passage so have a small ceremony and when your kiddo is old enough present them with a very special knife. My daughter received her first one at 9 during a camping trip. We made a huge deal out of it. Recently we did the same thing when she became one of my instructors, receiving an Air Force survival knife. Make them earn it, learn to use and respect it, then reward them with it.
I still have my first Buck 110 that my grandfather gave me.

How to Swap Batteries in a Head Lamp

Basic-but I know adults who struggle with this. The head lamp is one of the first survival items you can add to a pack. Practice changing batteries at Camp Living Room then move it out to Ft Backyard. Practice at night since this is when most dead batteries are discovered.


How to Make Fire

This is the single most confidence building skill for kids going into the back country- but take it beyond learning how to produce a flame with a cotton ball and petroleum jelly. Teach them how to clear an area, when fire is at high danger, and how to build at least two types of fire pits.

Start with simple skills- then progress to more difficult scenarios

Start with simple skills then progress to more difficult scenarios

Get them proficient with one method (striker and cotton)and move them into other techniques. Practice on clear days and move them into adverse conditions like rain and snow. Be patient. This can be a difficult skill to learn, especially when working in wet and windy conditions. If you don’t have one, build a fire pit in Ft Backyard for practice.
This is a skill that needs to be practiced regularly at home, on family camping trips, and days hiking in the woods.

As an added bit of fun, experiment with friction methods like the bow drill.


How to Signal for Help

Signal mirrors and whistles are just a start. By the time your kiddo is 10 they should be able to properly use both of these. At 10- this is a solid start into other signal skills.

Signal is simple in concept- but teaching correct target aquisition takes practice

Signal is simple in concept- but teaching correct target acquisition takes practice

Know How to Fish
Teach a kid to fish. Then teach them how to use the small kit in their survival bag. Also- have them clean, cook, and eat what they take.


How to Give First-Aid/Self-Aid

Start simple. Being prepared and knowing how to use ALL the contents in their kit is essential.


How to Get Water

A small filter system is best for 10 year-olds olds and then moves them into more advanced skills with tablets, boiling, etc.
Don’t forget the obvious– where potable water is help in parks and camp sites.

How to Use a Slingshot or Bow
Another lost art. Teach the basic, go to the woods for some stump shooting, then either at FT Backyard or on a camping trip have them take game. We purchase quail or chickens for practice. It is good for a kid to understand that life must be taken in order to preserve life. Eat what you harvest and have them begin to learn how to field dress game respectfully.

How to Handle a Fire Arm

Shoot or don’t shoot. Just teach them how to handle it safely, and it’s not a toy. If you are gun adverse, at least teach them to leave it alone. If you are okay with your kiddo handling guns, get them training to do it correctly.

Abby and Dan

All of these are basic skills any 10-year-old can perform, but it is up to you to provide them a safe educational environment. For more information or to get us involved and partnering with you, please check us out at http://www.AdventureIQ.com

His and Hers – A Love Story

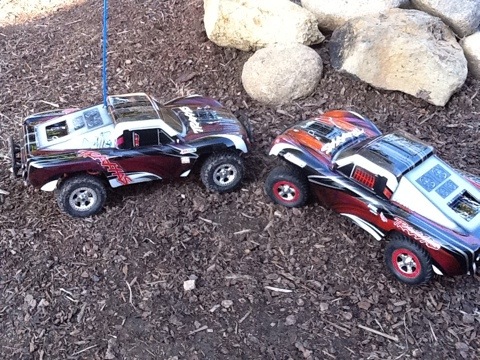
This story was originally part of a series I wrote for another blog. Thought I would repost it due to a few questions I have been getting on smaller RC rigs. These little rigs are great to travel with and one of mine has almost frequent flyer mileage as I do.

I have had several Revos, Slashes, Rallys, and combinations, conversions, and off-shoots of these three. But by far the most fun I have had was building these two rigs with my wife.

A few weeks ago she showed an interest in an old buggy. Now she has always loved building and painting but driving was not so fun for her. I took an old slash and put a 23 turn motor in it and placed in training mode. In the privacy of our backyard track she learned to like it. Then last week for the Sweet 16 Rally we held here, we picked up a mini slash for non rc visitors to bash. She fell in love with the car when placed in training mode.

Her rig is stock and has the 12 turn Titan but soon to have a 23 turn HPI. That should give her longer run time and slower speeds

My rig has the Velenion brushless with Traxxas ESC, Traxxas and Integy aluminum, and run it on a Spektrum controller.

On neither rig am I overly concerned with having top shelf race parts, and use trickle down stuff from my prime rig…the Revo.

The Slash takes a lot of lip because of stability. My argument is that if you drive a car within its limits you don’t flip as much. We can go through several battery packs in an evening without ever being on our lids.

I’m enjoying our time in the yard with these rigs. I’m kind of anal about similar rigs running at the same time so its nice we are driving short course rigs at the same time.

20111019-173803.jpg

Re Post: Babes in the Woods

Video: GPS for Confidence Building
I wanted to repost this since–my “Babe in the Woods” has been promoted to a cadre position on my team…

20130422-110343.jpg

Lighting a fire in wet conditions, and not rescuing from the failures is tough…

I have never been a fan of the notion everybody wins. When coaching youth roller hockey in San Antonio, I had one of the few, and eventually the only program that still kept score in the YMCA portfolio of sports programs.

I believe that you need to give kids a realistic view of their performance, but done so in a way that you leverage their strengths in whatever evaluation you are doing. I don’t believe in sugar-coating the feedback, or playing with soft gloves. I also don’t believe in being harsh on them either.

In all my workshops, coaching endeavors, or training I do with kids, military leaders, new adults to the woods, etc is the same… I define the conditions and expectations, allow them to perform, allow them to self evaluate, and then provide guidance and feedback.

The other aspect is tough. I don’t rescue. I allow failure as long as safety is not compromised. Nothing is learned if I am constantly helping a participant to a point I am completing the task them.

Let’s discuss two situations where I have to guide a participant differently.

The first is a fire building scenario. The participant has a good grasp of the concept, understands how to use flint and steel, knows the type of tinder and has been highly successful in starting fires in the past. But this has all been in controlled conditions when it has been fair weather and dry materials.

Survival fires though are most often needed when conditions are wet and clammy. To really test skills, I have to put the participant into real conditions so they not only have the ability to start fires and get warm when most needed, but to have the confidence to do so.

Most fail in getting the fire started in these conditions. Many times, I fail. It is a difficult test to complete. But the real learning is through the debrief with the participant and allowing them to do it again.

Watching a participant unnecessarily expending energy to grab materials, using the wrong materials, standing by and watching the fire not start can be irritating and the desire to jump in can be powerful. But I have to let them fail. This is because the participant has acquired a level of mastery in controlled conditions that can lead to over-confidence which is just as dangerous as not having the skills at all. Here you have to have the tough love and not jump in, allow them to identify their own mistakes, and then provide guidance.

In the other situation, a participant who is new to GPS navigation. In this scenario, the participant is just learning, and allowing them to fail outright as they work to program coordinates, follow the gps to a target, and try to find the best path to get to the target can be overwhelming. In this case I will work closely with the participant and provide constant coaching and working them to success. I still use the same debrief techniques of “what, so what, now what” that I have discussed in the blog and podcast in the past.

Building a solid toolbox of skills is an on-going exercise. As a team, constantly work on our skills to either keep them sharp or learn new techniques. It is also what helps us in communicating with each other and building our team and our families to a tighter cohesive group.

I am not a fan of the everybody wins philosophy. In the back-country people die. There is no second place with mother nature, just a body bag.

Original article: http://waukeefamilyymca.blogspot.com/2011/09/everybody-plays-everybody-wins.html

For more information about us, please checkout http://www.AdventureIQ.com for other blogs, podcast, and videos.

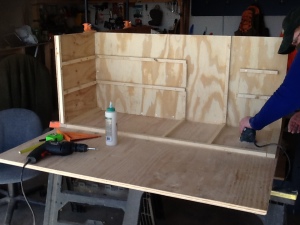
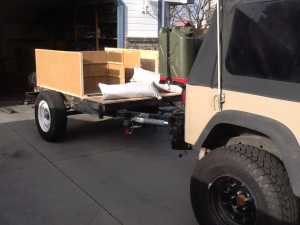
Our Trailer Build in Pictures

Last year a buddy of mine and I built my expedition trailer. While I still need to do a full blog article, I thought I should at least share the pictures of the build…based on what I could find on my hard drive…so here you go– more details to follow.

Not in any order–random pics I found

DCIM100GOPRO DCIM100GOPRO DCIM100GOPRO DCIM100GOPRO DCIM100GOPRO DCIM100GOPRO DCIM100GOPRO DCIM100GOPRO DCIM100GOPRO DCIM100GOPRO DCIM100GOPRO DCIM100GOPRO DCIM100GOPRO DCIM100GOPRO DCIM100GOPRO DCIM100GOPRO DCIM100GOPRO DCIM100GOPRO DCIM100GOPRO DCIM100GOPRO DCIM100GOPRO IMG_1082 IMG_6815 IMG_6819 IMG_6822 IMG_6825 IMG_6826 IMG_6827 IMG_6828 IMG_6829 IMG_6837 IMG_6838

Five Games to Keep You Sane

We have all been on that trip.

A camping trip where it rains the entire weekend and you have hours to spend in a trailer, camper, or tent. The Christmas road trip where you get stuck in a hotel for multiple days because roads and passes are closed. The vacation that has you pent up for hours at an airport due to missed or cancelled flights. I started carrying miniature versions of games with me when I was deploying around the globe in support of my military occupation. They were great for keeping me entertained, and sometimes meeting new people.

When the DS or Gameboy batteries or adventures become stale, the internet has been surfed to its end point, one can’t possibly look at another paragraph in that awesome book bought along, and when the boredom monster strikes, we have an arsenal of games we pull out to keep us connected as a family, occupy time, and combat the temptation to flame each other. These are the five games to keep you sane on a road trip, adventure, or vacation.

Uno
This is an old standby that gets overlooked. Don’t worry about buying the mini-version and if you already have the updated Uno Spin, just ditch the wheel and grab the cards. Probably better known here in the U.S., Uno is card game which is played with a specially printed deck. since 1992. The game is similar to Crazy Eights that my Grandpa Turner would play with me as a kid.

The Uno deck has 112 cards. There are 26 of each color (blue, green, red, yellow) each color having two of each number except 0, and 4 blank cards. The numbers in each color are 0 to 9. There are also cards directing the actions of “Skip”, “Draw Two” and “Reverse” Finally, the deck contains four each of “Wild” and “Wild Draw Four” cards.
It’s a fairly simple game to play and we started Abby on it around when she was 8 or 9 years old.

Zombie Dice
I’m just not into the whole Zombie thing. I don’t have a Zombie bug out bag. My rig doesn’t have anything that is Zombie proof. I don’t even have a Zombie hunting permit. But I do have Zombie Dice!

I like Zombie Dice because it is more than luck, you have to take risk with your luck…probably much like a real zombie apocalypse. Each player on their turn has to shake a cup (we use a Crown Royal bag) containing 13 dice and randomly select 3 of them without looking into the cup/bag and then roll them.

The faces of the dice represent brains, shotgun blasts or “runners”. There are various colors of the dice, green, red, yellow. Each color has a its own distribution of faces, the green dice have 3 brains, 1 shotgun and 2 runners, the yellow dice have 2 of each and the red dice have 1 brain, 3 shotguns and 2 runners.

The object of the game is to roll 13 brains. If a player rolls 3 shotgun blasts their turn ends and they lose the brains they have accumulated so far that turn. A winner is determined if a player rolls 13 brains and all other players have taken at least one more turn without reaching 13 brains.

Story Cubes
I have presented these before in our videos and podcast and have even used them to interrupt writer’s block. The idea is to roll the images on these story cubes to make up your own once-upon-a-time type story. We like this game because even though it is simple, it requires someone to think out of the box and be creative.

There are several variations we use other than one person rolling and telling the whole story, we also will have someone roll, and then each takes a turn in telling the story. I also use this as a tool in my presentation skills workshop when working with a team that is highly technical and very little conceptual in their Emergenetics profile.

Timeline
This is one of our latest editions. I was actually a tester for this at a conference awhile back. I like it because we use it to learn more about historical events, inventions, and other interesting happenings of the past.

With Timeline you have to make decisions if the mouse was invented before or after the laptop computer or did the Crusades happen before or after the Black Plague? This game takes up a bit more space and needs a flat surface.

There are several kits including Inventions, History, and Diversity. We like to mix and match the sets. If you have Internet, keep an iPad or other device close by to look up and learn more about an event or invention.
At the beginning of the game, players all get the same number of cards representing monuments, inventions, etc. On the back of each card is a date.

To begin, one card is randomly drawn from the deck. This card is placed in the middle of the table, date-side up and is the starting point of a chronological line which will slowly be built by the players. The first player then chooses one of their cards (they cannot look at the date).
If the player thinks that the invention on their card came before that of the initial card, the player places their card to the left of the initial card. If they feel that the invention on their card was created after, it is placed to the right of the initial card.

Once placed, the player’s card is then turned date-side up. If the player was right, it remains on the table. Otherwise, the card is discarded and a new one must be drawn to replace it. The first player to get rid of their cards wins.

Flash
Another rookie to our game roster. This is allot like Yatzee, only way cooler and not as time consuming. Flash is a lightning fast dice game. Players work to rack up the most points as they race through 8 dice challenges. Everybody rolls for a specific set chosen and any player could score.

Flash has several game variations you can play. If it’s an adult party, it could easily become a drinking game.

It comes with its own travel pouch which makes it a game on the go.

You Can Help Support Free Survival and Outdoor Training
Every year we provide free survival seminars to kids and adults. This year we will teach close to 1200 individuals how to comeback alive should they find themselves in a backcountry emergency at no charge. Be sure to check out our website for these games and use any of our Amazon links from there to purchase. All your Amazon purchases go for gear we use in our free survival seminars.

20140315-084949.jpg

SCX 10 Mods

Our first weekend with the rigs...pre-modifications

Our first weekend with the rigs…pre-modifications

There is nothing like pulling your new rig out of the box for the first time. It’s like a new-born. It even smells new. So many unknowns, especially if you are new to the RC adventure world. Like parenting, there are so many opinions out there. So many directions to take your rig.

My first piece of advise, just drive. Go have fun. As you see the need or things break, then replace the parts. Go to any hobby shop or RC event, and just like in raising kids, you get advise. I have a hard time over-looking the advise-giver’s screaming brat as I grow old of the spontaneous Parenting 101 class.

Other accessories like sand ladders not only look great, but also useful to the scale experience.

Other accessories like sand ladders not only look great, but also useful to the scale experience.

I have been asked to share modifications and upgrades I made to my SCX 10 Wrangler. While Melissa and Abby went the route of RTR (Ready-to-Run) I opted for a kit. I was not interested in a used rig since 1) every owner wants what they put into it-and they are never worth the asking price and 2) I specifically wanted a fantasy version of my new 1:1 JK Wrangler.

 First, I built, well had lots of help building, OK, Troy from Team Dewey built my ride from a kit. But I did help. OK, I stayed out-of-the-way mostly. He let me do the body and put some stickers on…and the shocks…

 We ordered my rig as a kit and I provided the electronics. Originally it had a Traxxas ESC, which has now been upgraded to a Castle Side Winder 3. The upgrade was based on the need to run 3S LiPo batteries. Using 3S has had its own love/hate relationship. I like the Castle since it is both waterproof and programmable. I can set everything from LiPo cut-off to braking power.

 The Vanquish LED light-bar requires 3S to run. The ESC was really designed for 2S, but held well on 3S. The lights require 3S and provide enough illumination on the trail that I really don’t need a headlamp when doing night adventures. I have also used the lights on my RC to sift through the camper at night. It is seriously bright.

 Another 2S/3S battle I fight is with my winch. I use the RC4WD Bull Dog. This winch has been debated to no end, specifically from the guys who crawl. I was advised against it, specifically from a local Treasure Valley shop that also earned my distrust on so many other issues. The winch is designed to run on 2S, a direct conflict with my 3S battery selection needed to power the lights. So I use a BEC from Castle to power the winch. The BEC draws power directly from the battery and places it into a usable power source for winching. RC4WD now has a new WARN winch that will handle 3S. My hopes are to get one soon to test. I really like my RC4WD winch.
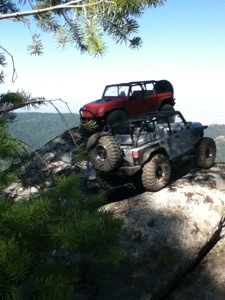
Drive stock until it breaks. By then, you will have a better idea for your needs

Drive stock until it breaks. By then, you will have a better idea for your needs

Why the crawling communities shy away from the winch is beyond me. All three of the AIQ rigs have one and we have yet to have any issues. They pull well, easy to use, and look great. I had push back at one point that it will lift only 6lbs. My rig weighs in at just over 6lbs. I cannot think of a situation where I would need to lift my entire rig up at 90°. If I did, well that’s what pulleys are for. I drive scale trails in scale conditions. The day I find an obstacle that is a 4x the height of my rig that I have to winch strait up, I will start doing it in the scale world. I am in this to keep it real. I don’t take my 1:10 rig over tree stumps.

Speaking of weight, that seems to be the first question I get from comp crawlers. To be honest, I don’t know, nor do I really give a rat’s hind quarters. It seems like there is some kind of weight envy out there, like these guys convert the weight of their rig to penis length. Okay, I come in at over six, but I’m happy….with rig weight that is…

 For the power plant, I started out with a Thunderbolt 55T motor. I moved to a 35T because I wanted more speed on the trail and still have torque when I needed it. My wife and kiddo still have 55T on their rigs, and this summer I want to see how the rigs perform when running wide open on trails. Heat could be an issue as they drive wide open to keep up speed.

063

I have tested a few wheel and tire combos since getting the rig. Right now I am running RC4WD Super Swampers and very happy. They work great in sand, snow, rock, and gravel. When they get wet, they get super sticky.  I have minimal wheel weights from Axial up front. Again, the comp guys swoop in for the attack…but I don’t run wheel weights on my 1:1 rig…I mainly have weight in the front of the 1:10 to simulate the weight disbursement of my 1:1. Running bead-lock wheels are from Axial.

The RC4WD winch sits happily on top of a RC4WD shorty bumper for the JK. It mimics the Rugged Ridge bumper on my 1:1 JK. Abby and Melissa are also using bumpers from RC4WD, but all three of us chose different styles.

At the heart of all that tugging power is a Pull Pal land anchor. Both Melissa and I have one. (Abby keeps saving up for one, but never gets there…) I have tested 4-5 other land anchors and the most happy with the Pull Pal.

On the back I have added a dual gas can rack from DS Pro. They build great stuff. It will also hold two shovels but they either fall out or break on a roll. No big deal, I moved the items into a new location. The team from DS Pro is awesome and they really back up their products. The stuff looks and funtions well.

I replaced my sliders with an aluminum set from BPC. I won these at a G6 and love them. The only downsides have been 1) they don’t come with compatible screws to attach the sliders to the chassis, and the Axial screws are too short to bite and hold in place and 2) The angle you have to get the driver to engage the screws is impossible to get at. I will run them until I get a custom set. I have the Castle ESC and my water-proofed radio receiver servo-tapped to each one.

Speaking of Radio, I use a Spectrum that I bought used from Troy. It has a programmable channel that I operate the winch from. I have it tied to a lanyard, which stays clipped to a D-Ring on my day pack.

 This week I did add aluminum C-Hubs in the front from Axial. Testing…testing..testing…

 As for Servo, I have an unknown servo I rebuilt a few years ago. When it dies, a Savox water-proof unit is going in.

 Accessories include ice chest, shovels, Hi-Lift jack, sleeping bags, etc. I change this stuff out often, including a few rafts and canoes. I swear by my sand ladders from DS Pro and an MaxTraxx. I also use a yank strap that I made for getting others unstuck. I get asked how many scale points I rate….who freek’n cares! Other great items are from Awesome Action RC and Scott Anthony.

What I place on the rig depends on my groove. Taking extra batteries– add a few fuel cans… Eating lunch on the trail- throw on the ice chest- My 4-legged buddies hanging with me as I hike- yep- I even have a scale Trigger-Dog!

The crawling crowd around her scoffs the RC4WD winch, but my little rig is on the trails nearly every day and has not seen any issues to date. Here it is "winching-down" a fellow G6er

The crawling crowd around her scoffs the RC4WD winch, but my little rig is on the trails nearly every day and has not seen any issues to date. Here it is “winching-down” a fellow G6er

 The whole thing is powered up with a flick of a huge switch in the back. The light bar also has its own power switch. Everything is double water-proofed with Plasti-Dip.

Three G6s and hundreds of hours on the trail, pretty happy with my rig

Three G6s and hundreds of hours on the trail, pretty happy with my rig

The important point is get out and enjoy your rig. At the end of the day it is a toy. Be thankful that you live someplace where you can get out and simply enjoy the outdoors and you have the means to purchase a simple hobby.  Don’t get wrapped around the axle (no-pun intended) on brands, weights, points, etc. It’s about the experience.

Get out and adventure!

Get out and adventure!

Honcho SCX 10 Review

20140111-150154.jpg

As you already know, I am a hard core Jeep guy. I have an XJ, a YJ, and the latest has been a JK. My wardrobe is 90% Jeep shirts, hats, and this last Christmas my parents even found me a wallet. The house and office, yep Jeep. Even my 1/10 scale rc rig is a Jeep.

When I picked up our new Axial SCX 10 and had the choice between a JK Wrangler or a Honcho, I selected the Honcho against all my history with the greatest American vehicle ever made. I even lean towards Nissan and not Toyota, which the Honcho is clearly a Tundra.

The latest edition to the 1/10 garage fills several gaps. First, it is a seed truck. We want to recruit others into the hobby and thought having a demo rig would be a great way to do that. Second, going to events in other states and having your rig break or simply decide to not work is a joy killer. We had this happen to Abby at the G6 in Bend, Oregon and I had to pull parts off of her rig and place them on. 1/2 finished build we happen to have with us. Even on our local outings, I had a truck misbehave and wound up walking with Melissa and Abby on what has to be one of the greatest trail drives we have found to date.

The SCX 10 is a well proven platform. Driving the truck right out of the box without all the extra mods and accessories was pure fun. I took it out to an area we call “Mini-Moab” to do some testing with it. Just out of the box, no ladders, winch, Pull Pal, wheel weights…literally out of the box.

The 27t motor provides enough speed to make driving interesting, yet it doesn’t over-power the rig. It also provides some torque when needed for climbs. Since it is a brushed motor, I don’t have to worry about water proofing. On this rig the battery is already moved forward and it is stock with driving lights, yep…trail ready.

I have heard allot of drivers complain about the servo. First, it is not water proof. Second, it is said to be week. To date, the servo set ups in both Abby and Melissa’s rigs has done well and they both abuse them quite a bit.

The radio controller is great for out of the box. It is a 2.4 Ghz set up, so cross-communication with another rig is a very low risk. If feels great in the hand and feathering the trigger is easy to do with it. The main feature I like, it has a notch for using a lanyard. I hate setting my radio down in the mud, and since this truck will be used for newbies, the lanyard is a must to help keep it protected.

Again, driving the basic rig was a blast. One of the problems with this hobby is the elitist mind set of having to super-build a rig when starting out. Most seasoned drivers have forgotten what it was like to be new to the hobby. This rig can have you on the trails right away. All you really need is two solid rc batteries (which I will cover in a later blog and podcast), a decent charging station, 4 AA batteries for the radio, and a trail to go play on.

If you are in Idaho, this next year we will be doing adventure and expedition runs. These are not comps. These are fun get togethers to go run around on trails or other interesting areas to drive.

Be sure to check out the web site and facebook page, I will post some links over there. Remember if you purchase anything through our Amazon site, you support our survival training.

20140111-150400.jpg20140111-150423.jpg